
![]() Possibly one of the greatest things to happen to Java (in recent history) has been the introduction of the projects from the wonderful people at Spring.io
Possibly one of the greatest things to happen to Java (in recent history) has been the introduction of the projects from the wonderful people at Spring.io
The Spring team seem hell-bent on making our lives as Java programmers easier and easier.
I wanted to take a few moments to “tip my hat” to them with a few posts on the Spring projects I use and love the most.
The first project on deck is Spring Boot.
What is Spring Boot?
Ever dreaded the thought of having to set up / configure a brand new Java application (or web application)?
I have. Starting a new Java web project from scratch used to take me hours of work!
Finding the right MySQL DB connectors, making sure to include all the necessary Maven artifacts, creating the right folder structure. Web.xml, context.xml and application properties.
Hours and hours. Just to get to a point where I can make the project say “Hello World” when I visit the appropriate URL.
Spring Boot fixes this pain.
The best way to think about Spring Boot is that the smart ladies and gentlemen on the Spring team have hand picked the most commonly used libraries and put them together in such a manner that they work out of the box with sensible default settings pre-configured for us.
With Spring boot, you can just tell it that you want to create a web app, with JPA and a MySQL database. Then copy in the properties that tell it how to connect to that database and you're ready to rock.
I've timed myself… I can create an entire web app with a controller that integrates with a database and performs create and read commands… In 5 minutes.
So that's an entire web application, with database integration, from scratch, in 5 minutes.
And the only “code generation” is only class that has about 4 lines of code in it. This isn't like the Spring ROO days where you'd have hundreds of confusing lines of code created that made maintaining the thing a bit unwieldy.
I'm talking, dead simple, straightforward code… 5 minutes.
It's a bit of a game changer in my opinion.
Now we can quickly create web apps from scratch and potentially launch them via the cloud in under an hour. How much would that impress a potential client?
How to use Spring Boot
Okay, okay, you get it. Spring Boot is awesome… So how do you use it?
You have two options:
- Using the Spring Tool Suite IDE to crate a new “Spring Starter Project”
- Using the Spring Initializr website to generate a ZIP file
Note: Using the Spring Tool Suite IDE to create a “spring starter project” just saves you the small effort of importing the zip file and creating a project.
Either way you choose, you'll need to tell Spring Boot which “dependencies” you'd like to add to your new project.
By “dependencies” I mean that you need to tell Spring Boot if you'd like to include the libraries to support a web application… or if you'd like to use a MySQL database, or if you'll be using a templating framework (like Thymeleaf), etc.
My most commonly used libraries to include are as follows:
- Web (which includes all the Spring Framework stuff)
- MySQL
- JPA (which includes Spring Data)
- Thymeleaf (which allows you to create and use HTML files instead of JSPs)
- Spring Security
In this post, I'm going to use the first 4 of the 5 dependencies above.
That means that we're going to create a web application built with the Spring framework + MVC, that's integrated with a MySQL database and uses JPA (Hibernate) with Spring Data. All brought together with Thymeleaf for our “views” (i.e. HTML files instead of JSPs).
In other words, we're going to build a full-stack web application with Java.
The Nitty Gritty
So, the first step is to create your Spring Boot project.
I'll show you the “universal” way of doing it via the Spring Initializr.
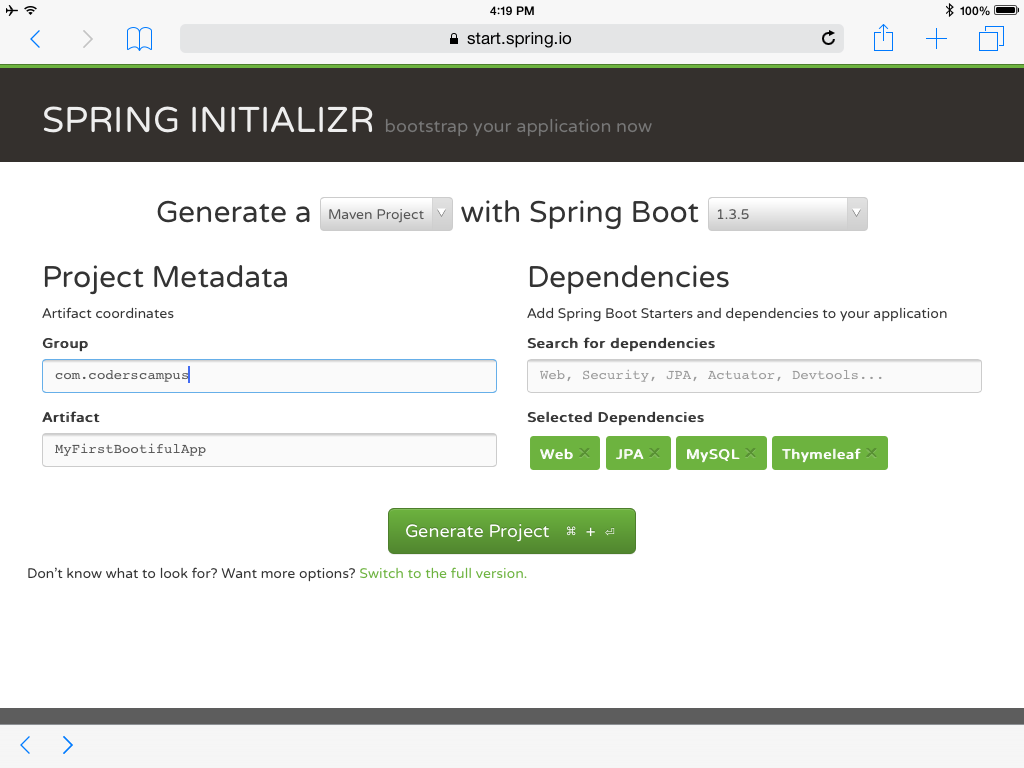
- Head over to start.spring.io
- Give your project a Group and Artifact name
- Search for and add dependencies
- Generate your project
Once you've completed the steps above, you'll have a ZIP file that you can import into your IDE of choice.
After impoting the project, you'll want to set up some properties to get everything primed and ready to rock.
Here's a sample of the properties that I use:
spring.datasource.url = jdbc:mysql://localhost:3306/

spring.datasource.driverClassName = com.mysql.jdbc.Driver

spring.datasource.username=example_user

spring.datasource.password=password123
spring.jpa.database-platform=org.hibernate.dialect.MySQLDialect
spring.jpa.show-sql=true
spring.jpa.hibernate.ddl-auto=update
spring.thymeleaf.cache=false
These properties are grouped by their use.
The first four properties tell Spring Boot how to connect to your MySQL database… You'll need to be sure to create a blank database that can be accessed by your computer. That is outside the scope of this tutorial, but I have taught this subject before and you can watch a tutorial here.
The second set of properties tell Spring Boot how you'd like JPA / Hibernate to Behave.
The last property is to tell Thymeleaf not to cache our HTML pages (caching is good for performance, but in a DEV environment it's annoying as you'll need to reboot your web server every time you make a change to your HTML files).
Okay, great… so you're at the point where you can fire up your new Spring Boot project in your web server.
To do this in the Spring Tool Suite IDE:
- Right click on the project
- Hover over “Run As”
- Click on “Spring Boot App”
If you don't see the “Spring Boot App” option (or the “Run As” option), you're either not using the Spring Tool Suite IDE, or you're not right clicking on the project folder in the IDE.
You should now see that your application boots up successfully! If it doesn't, the most common errors are that it can't connect to your database, so if you're struggling with that, maybe check other projects you've done where you successfully connected to your database in the past and see if you can spot any errors in your configuration.
Tips & Tricks
- Since we're using Thymeleaf for this project, you'll need to create plain old HTML files in the “templates” directory that got automatically created under the “src/main/resources” folder.
- Your javascript and css files should go in the “static” folder in “src/main/resources”
- You don't need to create an applicationContext.xml or a web.xml file, they're automatically created behind the scenes with sensible defaults in Spring Boot (you can always create your own if you like, it should override Spring Boot's versions)